1Create a Spaceship account and buy a domain
1-1Open the site, click the person icon at the top right → Sign up
Open www.spaceship.com. Click the person icon at the top right (①). A "Log in to Spaceship" window opens; click "Sign up" (②) at the bottom. The screenshot below is from the Simplified Chinese version of the site; the layout is the same.
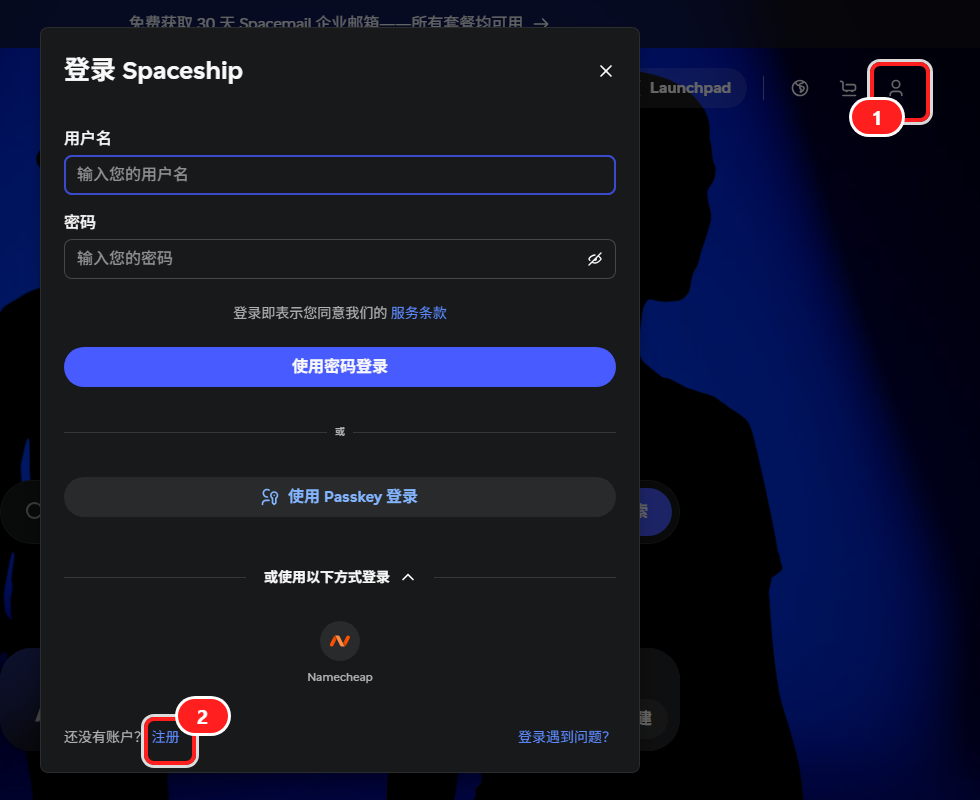
If a bar at the top asks "Switch to MYR / another currency?", choose "No, don't change". Payment is charged in US dollars.
1-2Fill in the sign-up form and verify your email
- ① First name and last name
- ② Email: use an email you use often and can receive mail on
- ③ Username: lowercase letters and digits only (a-z, 0-9). You need it to log in later, so write it down
- Tick "Verify you are human", click ④ "Next", then set a password as the page asks
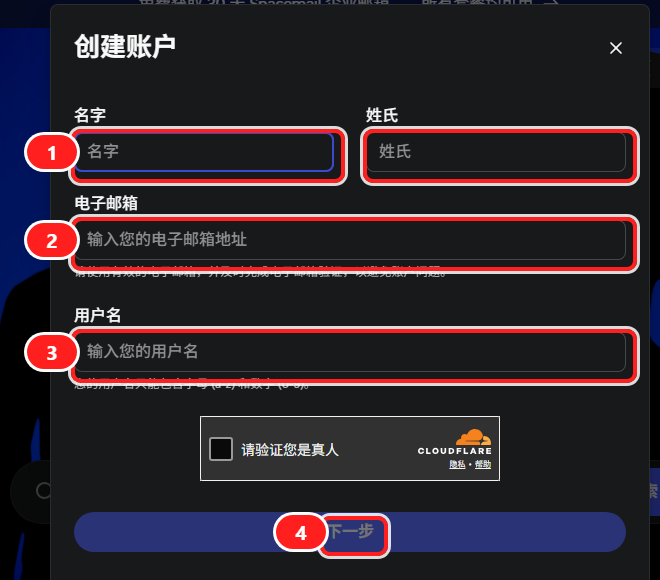
After signing up, find the verification email from Spaceship and click the link in it. The form on Spaceship's site says: use a valid email address and verify it promptly. If nothing arrives, check your spam folder.
The pages after "Next" (setting a password and so on) only appear after you actually submit the form, so there are no screenshots for them. Just follow what the page says.
1-3Search for the domain you want and add it to the cart
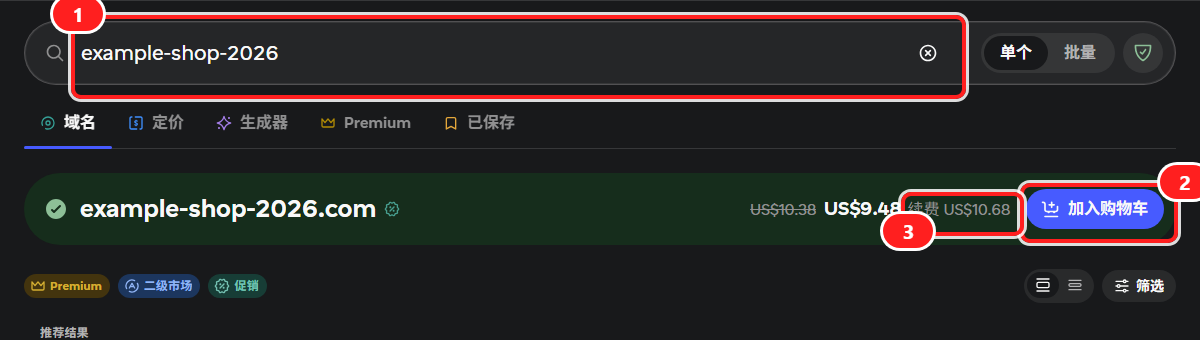
In the search box on the home page (①), type the name you want (no suffix needed) and press Enter. Names that are available show a price; click "Add to cart" (②). Look at the "Renewal" price (③): it is what you pay every year from the second year.
1-4Open the cart and enter a promo code
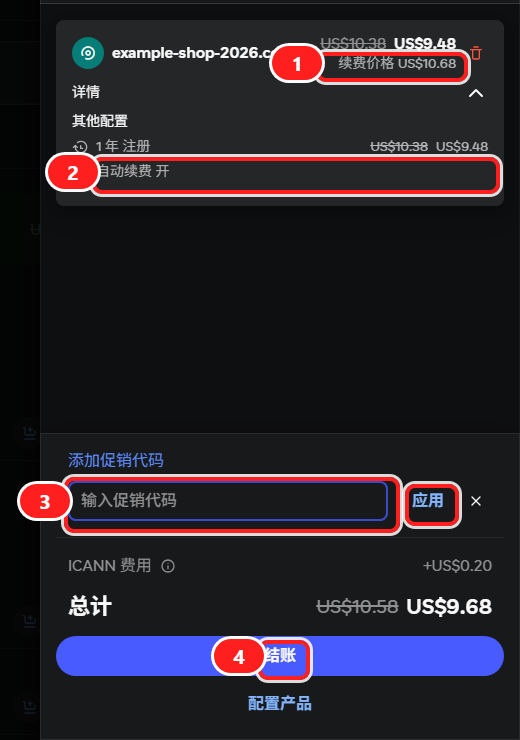
Click "View cart". If a "Complete your order / Popular add-ons" window appears on the way, just click "Continue" and do not add any extra product. In the cart:
- ① Take a look at the renewal price
- ② We suggest keeping "Auto-renew" on, so the domain does not expire by accident and take your website offline
- ③ Click "Add promo code", paste the code from the table below that matches your domain suffix, then click "Apply"
- ④ If the total goes down, the code worked. Then click "Checkout"
| Suffix | First-year price | Promo code | Notes |
|---|---|---|---|
| .com | US$2.88 (≈ RM12) | COMPROS | Best choice; one use per account |
| .com | US$3.60 / US$5.69 (≈ RM15 / RM23) | COM67 | Backup code (if COMPROS doesn't work) |
| .xyz | US$0.67–US$0.75 (≈ RM2.7–RM3.1) | XYZ52 | Cheapest |
| .net | US$4.78–US$10.18 (≈ RM19–RM42) | NET19 | |
| .org | US$5.57–US$6.65 (≈ RM23–RM27) | ORG20 | |
| .io | US$14.98 (≈ RM61) | IO85 |
Promo codes and prices are as shown on Spaceship's checkout page. The first-year price is not the renewal price; the checkout page shows the renewal price. Amounts in MYR (RM) are rough conversions at 1 US$ ≈ RM4.08 (2026-11-13); your bank may add a currency-exchange fee, and the real amount is the one on the checkout page.
1-5Pay
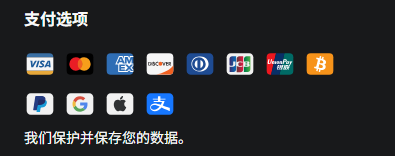
After "Checkout", log in, fill in your contact details and pay as the page asks. The payment options listed in the footer of Spaceship's site are: Visa, Mastercard, American Express, Discover, Diners Club, JCB, UnionPay, PayPal, Google Pay, Apple Pay, Bitcoin and Alipay.
1-6After you buy: three things to know
- Renewal price: the first year is cheap; from the second year you pay the renewal price (for example, on 2026-11-10 we saw .com renewing at US$10.68 a year, ≈ RM44 at 1 US$ ≈ RM4.08 on 2026-11-13). What your cart says is what counts.
- WHOIS privacy: Spaceship's site says it offers free domain privacy for almost all domains and adds it for free when you register. You normally do not need to buy or set up anything. (Official page)
- Leave DNS alone for now: apart from the "nameservers (NS)" you change in step 3, do not edit other DNS settings, and do not add hosting, email or other extras.
Video: Spaceship domain registration tutorial (by 工程師Tim) · Open on YouTube
The video is on YouTube and in Chinese. If you cannot watch it, just follow the text and screenshots above.
Video: Spaceship domain promo codes (by 王飞实验室) · Open on YouTube
The video is on YouTube and in Chinese. If you cannot watch it, just follow the text and screenshots above. The promo codes in the video may have expired; use the ones in the table above.
2Sign up for Cloudflare and add us as an administrator
2-1Create a Cloudflare account
Open dash.cloudflare.com/sign-up (you can switch the language at the top right). Fill in ① email and ② password (at least 8 characters, with 1 digit and 1 special character), ③ tick "Verify you are human", then click ④ "Sign up".
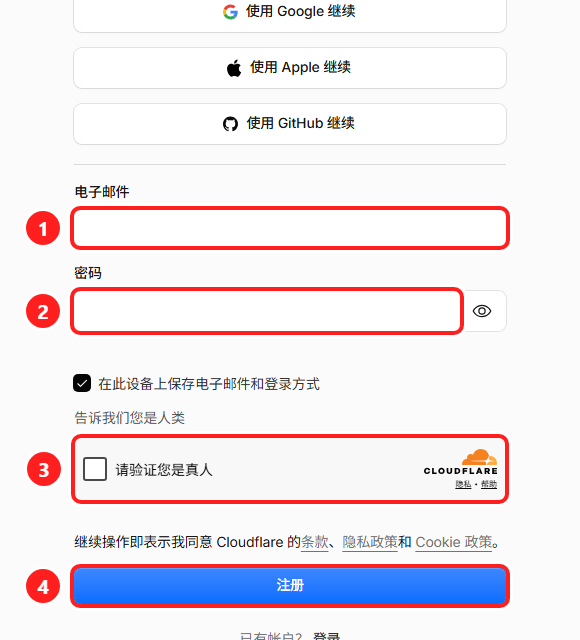
Be sure to click the verification link in your email. Cloudflare sends a verification email right after sign-up; an account whose email is not verified cannot add members (Cloudflare's documentation says so). If it does not arrive, check your spam folder, or log in and click "Send verification email" under My Profile.
Video: Sign up for Cloudflare in one minute (by 艾迪探索实验室) · Open on YouTube
The video is on YouTube and in Chinese. If you cannot watch it, just follow the text and screenshots above.
2-2Open the "Members" page
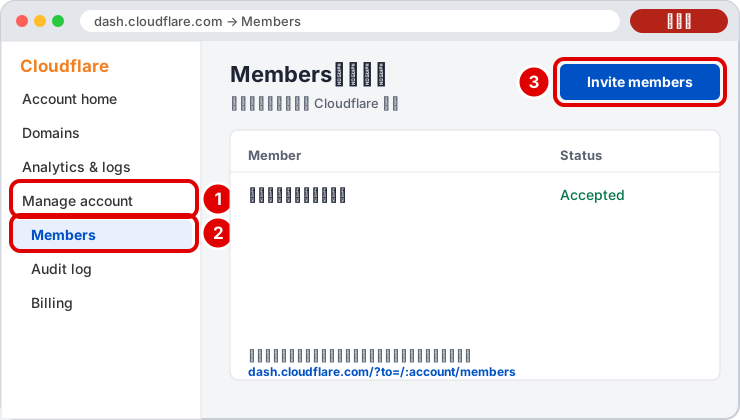
Log in to the Cloudflare dashboard and open your account's Members page. The easiest way is to open this link after logging in: dash.cloudflare.com/?to=/:account/members (the entry point given in Cloudflare's documentation), then click Invite members.
2-3Enter our email, choose the Administrator role, send the invitation
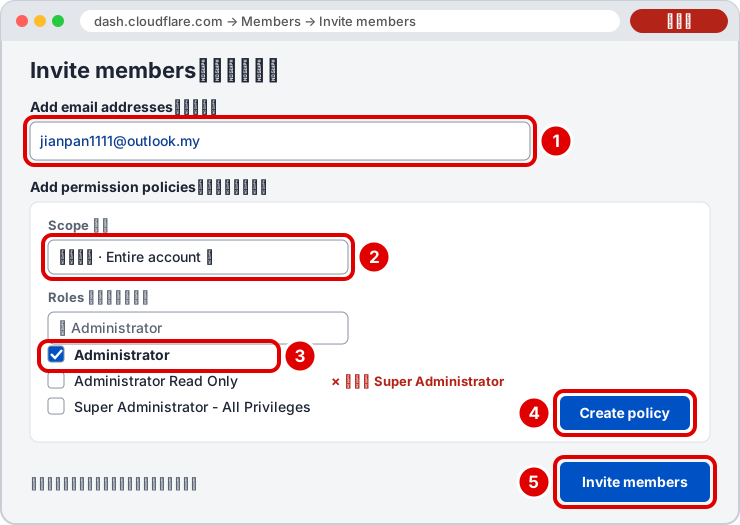
- ① Under Add email addresses, enter: jianpan1111@outlook.my
- ② Under Add permission policies, set the Scope to the whole account
- ③ Under Roles, search for and tick Administrator
- ④ Click Create policy
- ⑤ Finally click Invite members to send
Choose the Administrator role for the invitation. Do not choose Super Administrator.
Why Administrator: Cloudflare's documentation says an Administrator can access the whole account and change subscriptions, but cannot manage members or touch your billing details. Super Administrator means "all permissions" and should stay with you alone.
After you send it, we receive the invitation email. Until we accept it, it shows as Pending on your Members page. That is normal.
Video: Cloudflare tutorial: add a domain administrator and set permissions (by 老黑寫不停, in Traditional Chinese) · Open on YouTube
The video is on YouTube and in Chinese. If you cannot watch it, just follow the text and screenshots above. The dashboard in the video may look different from today's; for the role, follow this page (choose Administrator).
3Point your domain to Cloudflare (change the nameservers)
3-1Add your domain in the Cloudflare dashboard
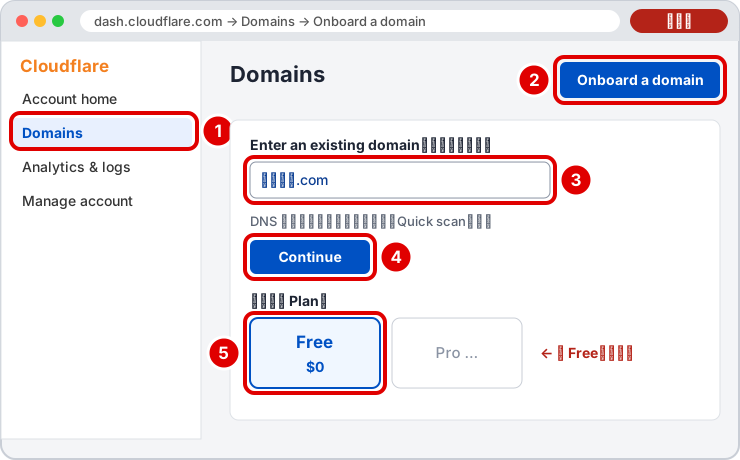
- ① Log in to Cloudflare and open the Domains page (direct link)
- ② Click Onboard a domain
- ③ Enter the domain you bought on Spaceship, for example yourname.com (no www, no https://)
- ④ Keep the default DNS record option (quick scan) and click Continue
- ⑤ For the Plan, choose Free
Cloudflare then shows the DNS records it found. A newly bought domain usually has none; just click Continue. We will set the records up later.
3-2Note down the two nameservers (NS) Cloudflare gives you
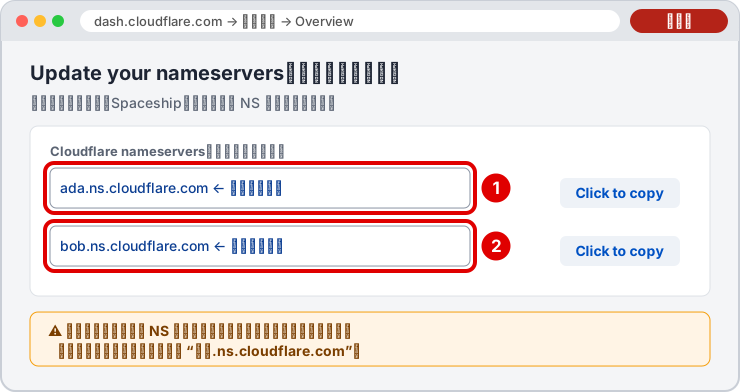
When the domain is added, Cloudflare assigns two nameservers to it, shaped like name.ns.cloudflare.com. There is usually a copy button next to each; copy them first.
Each account gets a different pair of NS. Copy exactly what your own dashboard shows, not the examples in this guide.
3-3In Spaceship, change the NS to Cloudflare's
Check DNSSEC first: Cloudflare's documentation requires that if DNSSEC is on for the domain, you turn it off at the registrar (Spaceship) before changing the NS, otherwise the domain may stop loading. If you are not sure whether it is on or where to turn it off, ask us before you change anything.
Following the steps in Spaceship's help article:
- Log in to Spaceship, open the Advanced DNS page and select your domain
- In the Nameservers section, click Change
- In the pop-up, choose Custom nameservers
- Paste the two NS you copied in 3-2 into the two boxes (delete any extra empty rows so only these two remain)
- Click Save nameserver settings
- In the "Are you sure?" box, click Yes, change to Custom DNS

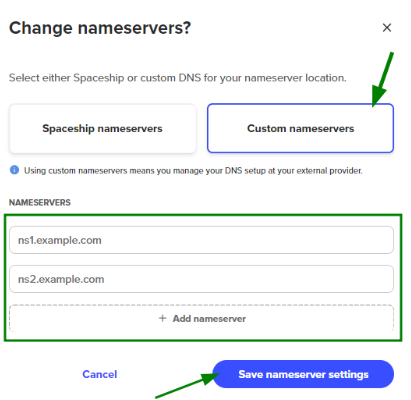
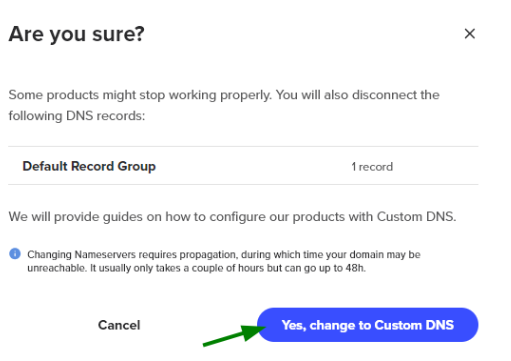
The screenshots come from Spaceship's official help article. Source: How to connect a Spaceship domain name to third-party nameservers. Spaceship's article says it can take up to 48 hours to take effect.
3-4Bought the domain somewhere else?
The idea is the same: in the registrar's dashboard, find "DNS servers / Nameservers" → change to custom → enter the two Cloudflare gave you → save. A few common ones (following their own help articles; the Alibaba Cloud and Tencent Cloud articles are in Chinese):
- Alibaba Cloud: Domain list → "Manage" on the domain → "DNS Management > Modify DNS" on the left → "Modify DNS servers" → enter the two → "OK" (Alibaba Cloud article)
- Tencent Cloud: Domain registration console "My domains" → tick the domain → "More > Modify DNS" → choose custom DNS and enter the two (this is how Tencent Cloud's bulk-change article describes it; the screen for a single domain may differ a little; Tencent Cloud article)
- GoDaddy: Domain Portfolio → pick the domain → DNS → Nameservers → choose "I'll use my own nameservers" → enter the two → Save (GoDaddy article)
- Namecheap: Domain List → Manage next to the domain → choose Custom DNS in the Nameservers drop-down → enter the two → click the green tick to save (Namecheap article)
Again, before you change anything, make sure DNSSEC is off.
3-5Wait for it to take effect: you are done when the status becomes Active
After changing the NS, go back to Cloudflare's Domains page. Until it takes effect the status is Pending Nameserver Update; once Cloudflare confirms, it changes to Active and Cloudflare sends a notification email to your inbox.
Cloudflare's documentation says: "Wait up to 24 hours while your registrar updates your nameservers". It also says Cloudflare makes a first check about 60 seconds after you add the domain, and later checks come further and further apart, so there is no need to keep refreshing: come back after a while, or wait for the notification email.
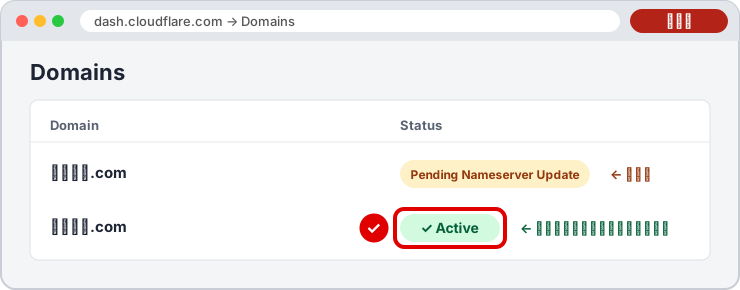
If a domain on the free plan has not become Active within 28 days, Cloudflare deletes it automatically. If more than 24 hours have passed since you changed the NS and it is still Pending, contact us and we will help you look.
Video: Moving a SpaceShip domain to Cloudflare and fixing invalid nameservers (by Small Step - 小布) · Open on YouTube
The video is on YouTube and in Chinese. If you cannot watch it, just follow the text and screenshots above. The second half of the video covers A-record setup, which we do for you; you do not need to touch it.
Video: How to host your domain on Cloudflare (by InfiCheesy) · Open on YouTube
The video is on YouTube and in Chinese. If you cannot watch it, just follow the text and screenshots above.
4When everything is done, send us this
- Your domain (for example yourname.com)
- A screenshot of Cloudflare showing the domain status Active
- Your Cloudflare sign-up email (we use it to check who sent the invitation)
Do not send your password. We will never ask you for a password or verification code. Anyone who asks for one in our name is a scammer.